
Case Study: Creating Video Tutorials Assembly Line Style and Camtasia Tutorial Before and After
Usually I wait until a project is finished then discuss the “Lessons Learned” with the members of our Screencast Video Coaching during the weekly webinars.
But, currently, I’m working on about 50 tutorials for a big corporate client and we have an “Assembly Line” process going that I think many of you could use if you find yourself needing to put together a bunch of software tutorials in a short time.

CASE STUDY: GPC
There are times when an organization or small business will contact me to help them create a large batch of tutorials for a new software application. Sometimes they will need them in a short time-frame and are more concerned that they be accurate and completed quickly rather than full of bells and whistles.
The Genuine Parts Company has been a long time client of mine and, in addition to having been a Project Manager there about ten years ago, I have also been contract to do Camtasia training and various videos over the years.
Recently, I was tasked with helping Product Managers create 50 tutorials that needed to be uploaded prior to a large meeting (where they are introducing some new software). The requirements were that the tutorials would be no longer than 3 minutes each, would contain a logo, an intro/outro with music, some zooms, callouts, a highlighted cursor and professional narration.
Because of the short time frame, GPC would be doing all the recordings themselves with a team of 5 Product Experts.
Half Day Best Practices Session Camtasia Training
We started off with a Project kickoff meeting where I conducted a half day training session with the Product Team. I taught them how to write Storyboards for specific tasks end users would be doing in the new software. Then, I explained how to use the Camtasia recorder to record themselves walking through the task. I reminded them how important it was to have created test data that they could use in the various procedures. This can sometimes be the hardest part of recording a tutorial-just gathering enough sample info that you can use to demo a procedure.
Once each brief tutorial was recorded the product manager would pass it on to me to do the rest. Lots of best practices were incorporated into the training so that the recordings would not need a lot of extra editing.
The Video Stylesheet
Because there were so many product specialists working on creating the tutorials for the new software app I knew that we needed to make some upfront decisions and get a good process in place right from the beginning.
So we spent some time developing a Video Style Sheet which specified
- Specs for the final videos
- An animated logo
- Fonts/colors
- Callouts/annotations
- Animated bullet point styles
- Intro and outro/with music
We also figured out how we would share files, how folder would be set up and how many tutorials would need to be completed each week to meet our goals.
The Tutorial Process
So the process, basically, went like this. The developers would
- Write their Storyboard and record themselves walking through a feature. They included some scratch (rough) narration that would be recorded over later.
- Produce their semi-edited video to an mp4 then,
- Export their Camtasia Project as a zip file from within Camtasia
The process would then move to me where I would
- Send the storyboard plus the mp4 with their voice to a voice over talent (http://www.dylanwhite.com).He would then record the narration using their scratch audio as a guide and synchronize it perfectly to the Camtasia recording.
- Replace the “scratch audio” (created by the Developer )with Dylan’s narration.
- Edit the video by speeding up text entry and cut areas with no action going on, enlarging and highlight the cursor, adding zooms and the chosen Callouts, adding an animated logo, title screen and the outro with music then lastly
- Reproduce it and upload it for review
With this method we have produced 25 of the tutorials in the past couple of weeks and will have produced the remaining 25 by March 12th.
A Couple Tips
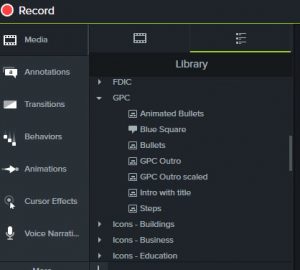
#1 Use the Camtasia Library To be super efficient with this process keep all of the repeatable items in the Camtasia Library in a folder specifically created for the project.
And write down the steps you will do, in order, for each video so you become like a well oiled machine.
#2 Smooth Cursor Movements If the person who is doing the recording moves their mouse all over the place and doesn’t give you nice, purposeful, smooth movements it is VERY hard to correct this. The only thing you can do is keep lowering the cursor opacity to “0” while the mouse is erratic then bring it back up when the mouse goes where you want. Emphasize this strongly when you show others how to get you the best recording.
Camtasia Editing Before and After
Here is the BEFORE when I get it from the Product Manager:
Here’s the tutorial after I spiffed it up. BTW- You’ll only get the full HD 1080p quality if you watch it on YouTube, full screen and choose 1080p in the settings.
This type of assembly line method could work well even for just a handful of videos if you know they will all have repeating elements such as an intro, outro, music, annotations, bullets, cursor effects, etc.
It’s always been important to me to not only teach Camtasia but to always be working on videos for either clients or for our website audience. It’s really the only way to stay current on the Camtasia and PowerPoint updates and to be able to solve problems for our members.
If you have any questions about this project just let me know in the comments section and I’ll try to guide you to replicate this process.
Michelle Schoen